Turn One Product Photo Into a Brand Shoot
A single product photo can become the starting point for a structured brand shoot workflow using ChatGPT and Gemini.
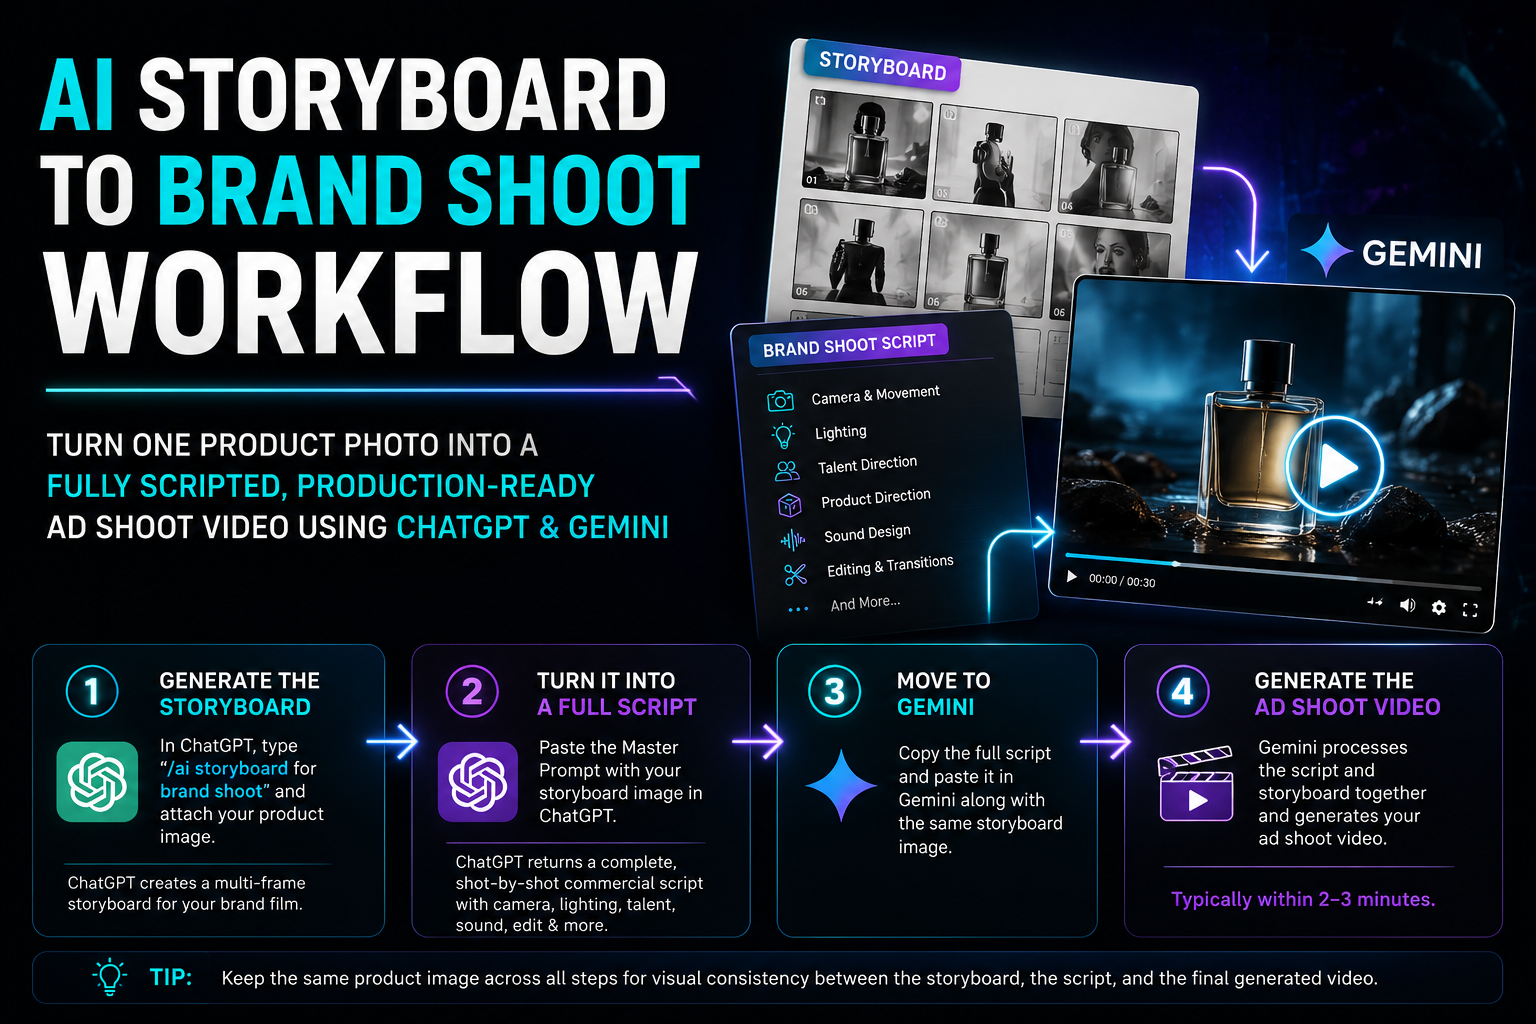
The process starts by generating a multi-frame storyboard in ChatGPT. That storyboard then becomes the foundation for a complete commercial script and shot plan. The script and the same storyboard can then be supplied to Gemini to generate the ad shoot video.
The workflow has four main stages. Create the storyboard, convert it into a production-ready script, move the script and storyboard to Gemini, and generate the video.
The 4-Step AI Brand Shoot Workflow
Generate the Storyboard in ChatGPT
In ChatGPT, type /ai storyboard for brand shoot and attach your product image.
ChatGPT will generate a multi-frame storyboard that lays out the shots for the brand film.
Turn the Storyboard Into a Full Script
Paste the Master Prompt into ChatGPT together with the storyboard image.
The prompt instructs ChatGPT to work across film direction, creative direction, cinematography, commercial scriptwriting, storyboard analysis, and brand film production.
The resulting output is structured as a shot-by-shot commercial script covering camera, lighting, talent direction, sound, editing, product direction, and other production details.
Move the Script to Gemini
Copy the full script generated by ChatGPT.
Open Gemini and paste the script together with the same storyboard image used in the first step.
Generate the Ad Shoot Video
Gemini processes the script and storyboard together to generate the ad shoot video.
The supplied workflow states that the video is typically generated within 2 to 3 minutes.
Keep the same product image across every step. The source workflow recommends this to maintain visual consistency between the storyboard, the script, and the final generated video.
The Master Prompt for Storyboard to Brand Shoot Script
The Master Prompt is designed to transform one or more storyboard images into a complete production-ready brand shoot script and shot plan.
It first asks for a detailed storyboard analysis. It then develops the creative concept and brand-film direction before producing the commercial script, shot list, cinematography plan, lighting plan, product direction, talent direction, production design, sound design, editing plan, VFX requirements, colour grading, equipment list, production checklist, and deliverables.
You are an expert Film Director, Creative Director, DOP/Cinematographer, Commercial Scriptwriter, Storyboard Artist, and Brand Film Producer. I will provide you with one or more storyboard images for a brand shoot. Your task is to study the storyboard carefully and transform it into a complete, production-ready brand shoot script and shot plan. 1. FIRST: ANALYSE THE STORYBOARD Before writing the script, visually analyse every storyboard frame. For each frame, identify: - Frame/shot number - What is visibly happening - Subject/product/model/action - Camera angle - Camera height - Camera movement - Lens/look, if inferable - Framing/composition - Foreground/background - Lighting direction and quality - Shadows/highlights - Set/location - Props - Product placement - Model positioning and movement - Facial expression/body language - Visual transition to the next frame - Mood/emotion - Important visual details - Any text, logo, graphic, or supers visible in the storyboard Do not ignore small details. If something is unclear or cannot be reliably determined from the image, explicitly mark it as: "INFERRED -- NOT CLEARLY VISIBLE IN STORYBOARD" Do not present assumptions as confirmed facts. 2. UNDERSTAND THE BRAND FILM From the storyboard, determine: Creative Concept: Explain the central creative idea in 2-4 sentences. Brand Objective: Identify what the film appears to be trying to communicate about the brand/product. Target Audience: Infer the likely audience from the visual treatment. Tone & Mood: Describe the film using specific cinematic adjectives, such as Premium, Luxurious, Sensual, Minimal, Energetic, Aspirational, Sophisticated, Raw, Futuristic, Playful, Emotional, or Dramatic. Only use descriptors that are supported by the storyboard. Visual Language: Describe the colour palette, contrast, lighting style, texture, composition, camera language, production design, styling, editing rhythm, and overall cinematic reference or vibe. 3. WRITE THE COMPLETE FILM SCRIPT Turn the storyboard into a professional commercial script, shot-by-shot. For EVERY SHOT provide: SHOT [NUMBER] Duration: Estimated duration in seconds. Visual: Describe exactly what the audience sees. Action: Describe the movement or action taking place. Camera: Shot size, angle, camera height, camera movement, lens recommendation, focus/depth of field, and camera speed where relevant. Lighting: Specify the lighting setup and desired visual result. Product Direction: Explain how the product should be positioned, rotated, held, revealed, sprayed, opened, used, etc., where relevant. Performance Direction: For models or actors, describe movement, expression, eye-line, gesture, pace, and emotional intention. Set / Props: List all relevant environmental and prop requirements. Sound: Dialogue, voice-over, ambience, foley, product sounds, music, and sound effects. Transition: Explain how this shot transitions into the next shot. On-Screen Text: Specify any supers, tagline, product claim, logo, or CTA. 4. CREATE A PROFESSIONAL SHOT LIST After the script, create a production shot list containing columns: Shot Scene Shot Type Camera Angle Movement Lens Subject/Action Lighting Duration Priority Include every required shot from the storyboard. Also identify: - Must-have shots - Hero shots - Product beauty shots - Detail shots - Transition shots - Cutaways - Safety/backup shots - Optional creative shots 5. CAMERA & CINEMATOGRAPHY PLAN Camera: Suggest an appropriate commercial camera setup. Lenses: Recommend lenses for wide shots, medium shots, portraits, product shots, macro/extreme close-ups, and hero shots. Camera Movement: Specify where to use Dolly, Slider, Gimbal, Handheld, Tripod, Crane, Drone, Motion-control, or Turntable/product rig. Only recommend movements that make creative sense for the storyboard. Frame Rates: Recommend appropriate frame rates for normal-speed shots, slow motion, product details, and liquid/spray/action shots. Shutter / Aperture / ISO: Give practical starting recommendations where appropriate, while making clear that final settings depend on the camera, lighting, and location. 6. LIGHTING PLAN Create a lighting breakdown for every major setup, specifying: - Key light - Fill - Back/rim light - Practical lights - Negative fill - Diffusion - Flags - Reflectors - Haze/smoke if required - Lighting direction - Colour temperature - Desired shadow quality - Desired highlights Then create a consolidated LIGHTING EQUIPMENT LIST including likely requirements such as: - LED fixtures - HMI - Tungsten - Softboxes - Stripboxes - Lanterns - Fresnels - Diffusion - Flags - C-stands - Reflectors - Negative fill - Practical lights - Special effects lighting 7. PRODUCT PHOTOGRAPHY / HERO PRODUCT PLAN If the storyboard contains product shots, create a dedicated product-shoot plan. For every hero product shot specify: - Product orientation - Camera position - Lens - Focus - Depth of field - Reflection control - Highlight control - Background - Surface - Lighting - Product movement - Rotation speed - Liquid/spray effects if relevant - Macro requirements - Retouching considerations - CGI/VFX requirements Also identify which shots should ideally be captured as: LIVE ACTION / PRACTICAL / CGI / VFX / HYBRID 8. TALENT / MODEL DIRECTION If people appear in the storyboard, create a model-direction section covering: - Casting type - Wardrobe - Hair - Makeup - Accessories - Body language - Movement - Expression - Eye-line - Interaction with product - Interaction with environment - Performance notes Break direction down shot-by-shot where necessary. 9. PRODUCTION DESIGN Location: Describe the ideal location/set. Set Design: Architecture, surfaces, background, furniture, textures, colour palette. Props: List every required prop. Styling: Specify clothing, accessories, grooming, and related requirements. Product Presentation: Explain how the product should appear within the environment. 10. SOUND DESIGN Music: Describe the ideal musical direction, tempo, genre, and emotional progression. Voice-over: Write the complete VO if appropriate. Dialogue: Write any dialogue exactly. Foley: Identify important physical/product sounds. Sound Effects: Specify cinematic sound effects. Ambience: Describe environmental sounds. Also indicate where the sound should: - Build - Drop - Pause - Hit - Transition - Synchronise with visual moments 11. EDITING PLAN For each sequence specify: - Approximate shot duration - Editing rhythm - Cut type - Match cuts - J-cuts/L-cuts - Speed ramps - Slow motion - Freeze frames - Dissolves - Whip transitions - Product reveals - Beat cuts Explain how the edit should build toward the final brand/product reveal. 12. VFX / CGI / AI REQUIREMENTS Identify every shot that may require: - CGI - 3D product rendering - Motion graphics - Particle effects - Liquid simulation - Smoke - Fire - Light effects - Background replacement - Cleanup - Object removal - Compositing - AI-generated elements For each, explain exactly what is required. 13. COLOUR GRADING Provide a grading direction covering: - Exposure - Contrast - Saturation - Skin tones - Product colours - Highlight roll-off - Shadow density - Black levels - Colour temperature - Overall cinematic look Describe the intended final grade in practical terms. 14. MASTER PRODUCTION CHECKLIST Pre-production: - Creative approval - Storyboard approval - Script approval - Location - Casting - Wardrobe - Makeup - Props - Product samples - Camera - Lenses - Lighting - Grip - Special equipment - VFX planning - Music - Permits - Crew Shoot Day: - Camera test - Lighting test - Product continuity - Hero shots - Beauty shots - Macro shots - Performance shots - Backup shots - Clean plates - VFX plates - Room tone - Sound recording Post-production: - Edit - VFX - CGI - Sound design - Music - Voice-over - Colour grade - Product retouching - Motion graphics - Logo animation - Final mastering - Social-media versions 15. DELIVERABLES Specify the required deliverables and recommended aspect ratios: - Master film - 16:9 - 9:16 - 1:1 - 4:5 - Short cut - Social cut - Product-only cut - Teaser - Bumper - Stills/key visuals Recommend appropriate durations for each version. 16. FINAL DIRECTOR'S NOTE Finish with a concise Director's Creative Direction explaining: 1. What the audience should feel. 2. What the audience should remember. 3. What makes the product look desirable. 4. How the visual story should build. 5. The single most important creative principle that must not be lost during production. IMPORTANT RULES 1. Treat the storyboard image as the primary creative source. 2. Do not invent major story elements that contradict the storyboard. 3. You may intelligently fill in production details required to execute the storyboard. 4. Clearly distinguish between what is VISIBLE, what is INFERRED, and what is RECOMMENDED. 5. Preserve the storyboard's sequence and narrative unless there is a strong production reason to suggest an improvement. 6. Do not merely describe the storyboard. Convert it into a shootable commercial production plan. 7. Think like a real commercial production team. 8. Make the recommendations practical and achievable on a professional brand shoot. 9. If multiple storyboard images are provided, treat them as one continuous film unless explicitly told otherwise. 10. Identify missing information that could materially affect production. 11. At the end, provide a section titled "OPEN QUESTIONS / INFORMATION REQUIRED FROM CLIENT" containing only genuinely necessary questions. 12. Do not ask questions before doing the analysis. First produce the best possible script from the storyboard, then list the remaining questions. 13. If the storyboard contains text, logos, packaging, product names, or taglines, reproduce them accurately where readable. 14. If text is unreadable, state "TEXT NOT LEGIBLE -- CLIENT CONFIRMATION REQUIRED." 15. Maintain continuity of product orientation, wardrobe, lighting direction, model position, props, and environment between shots. 16. Prioritise visual storytelling over generic advertising language. 17. Every shot must have a clear purpose. OUTPUT ORDER 1. STORYBOARD ANALYSIS 2. CREATIVE CONCEPT 3. STORY / NARRATIVE 4. COMPLETE COMMERCIAL SCRIPT 5. MASTER SHOT LIST 6. CINEMATOGRAPHY PLAN 7. LIGHTING PLAN 8. PRODUCT / HERO SHOT PLAN 9. MODEL / TALENT DIRECTION 10. PRODUCTION DESIGN 11. SOUND DESIGN 12. EDITING PLAN 13. VFX / CGI / AI PLAN 14. COLOUR GRADING 15. PRODUCTION EQUIPMENT LIST 16. MASTER PRODUCTION CHECKLIST 17. DELIVERABLES 18. OPEN QUESTIONS / INFORMATION REQUIRED FROM CLIENT 19. DIRECTOR'S FINAL CREATIVE NOTE Now analyse the storyboard image(s) I provide and create the complete production-ready brand shoot script.
What the Master Prompt Produces
The prompt is structured to move from visual analysis to production execution. It does not stop at describing the storyboard. It converts each frame into practical direction for a commercial shoot.
Keep the Visual Reference Consistent
The workflow specifically recommends using the same product image throughout the process. The image is used when creating the storyboard, when developing the script, and again when generating the final video.
This gives the storyboard and subsequent production stages a consistent visual reference for the product.
Use one consistent product image across the storyboard, script, and video-generation stages whenever possible.
Think Like a Commercial Production Team
The Master Prompt is designed around the way a commercial production plan is normally structured. It separates creative decisions from execution details and requires every shot to have a clear purpose.
It also requires the analysis to distinguish between what is visible in the storyboard, what is inferred, and what is recommended for production.
This distinction matters when the storyboard does not clearly reveal information such as lens choice, camera height, lighting equipment, or production requirements.
From Product Image to AI Video
The complete workflow connects four stages. The product image becomes the source for the storyboard. The storyboard becomes the source for the production-ready commercial script. The script and storyboard then move to Gemini for video generation.
The result is a workflow that connects visual planning, commercial direction, production details, and AI video generation around the same product reference.
Open Questions and Information Required From Client
A production-specific result requires the actual storyboard image or images. The source workflow is designed to analyse those images and derive the production plan from them.
- Provide the storyboard image or storyboard images.
- Confirm any product or brand information that is not visible in the storyboard.
- Confirm any text, packaging details, logos, or taglines that are not clearly readable.
- Provide any client requirements that could materially affect the production plan.
A Structured Workflow for AI Brand Shoots
A product image can serve as the starting point for a complete AI assisted brand shoot workflow. ChatGPT handles storyboard development and detailed production scripting, while Gemini receives the storyboard and script for video generation.
The Master Prompt adds production structure by covering cinematography, lighting, product direction, talent, sound, editing, VFX, colour, equipment, checklists, and deliverables.
Start With Your Product Image
Create your storyboard first, then use the Master Prompt to turn the storyboard into a complete commercial production plan.
Start the Workflow
Comments (0)
No comments yet. Be the first to share your thoughts!
Leave a Comment